Tuesday, October 6, 2020

in the POD - how much imagination do you have?


and first came the bathroom.....


*

Our order of 8020 aluminum finally arrived and Tim has been building the supports and shelves for the garage as well as the foundation for the few walls we will actually have. Of course, as the space/walls are laid out the infrastructure of the holding tanks, the wiring, the plumbing etc all have to be put into place as well. Currently, we have a huge puzzle that we are refining as we go along.


Tim in the background working on the garage

*
Yes, there will be walls around the toilet/shower room. Obviously, it will be a "wet" room so the walls will be PVC board and the whole space will be waterproof and sealed. 


*

The garage is coming together! Pretty much everything is in and accounted for - adding one more retractable hose to the lower right and we will need to cut 2 access doors for them in the side wall. 
(Yippee - cutting more  holes in the van!) We even ended up with some additional storage space.

Our next priority will be to get the heating system up and running so work can continue no matter what the weather has in store. Tim had set a goal for himself to be able to take a shower at the end of October....... so that means getting the bathroom totally enclosed and completed. 
Fingers crossed.


a working garage!

*

And we did take a very small breather from all the work..... we promised Rosie a little road trip. 
She has been (not so) patiently waiting for a ride in the van so we finally took her on an overnight to 
Cape Cod. And no, we did not "camp" in the unfinished van.

Ready for her adventure!

*


Monday, September 14, 2020

learning time when time has no meaning

moving through life


*

This summer Rosie has begun to understand and track time. It's an important milestone for a child - following the path of the seasons one after the other, days of the week, looking forward to a special event that will occur tomorrow or remembering something that happened yesterday, or just the simplicity of waiting 5 minutes. 

I first noticed it mid summer when she had a sleep over with us. I was awakened, very early, a small voice at the side of my bed. I opened my eyes to see that face smiling broadly, her hand touching my hand,  "Nene, I slept all night and it's tomorrow."

After that it seemed like every day there was another mention of time. "no Nene, that wasn't yesterday that was another day" and "it will be winter soon - and it'll be Christmas!" 

Now that she's back in school (a small learning pod) and on a consistent schedule, Rosie seems even more aware of the weeks' pattern  - 5 "school" days and 2 "home" days. She has taken to remind me that "swing time" is at the end of each day after she gets home from school. Specifically, her request for me to push her on the swing that hangs between two trees in the yard. And, she loves making deals for 1 hour or, if I hesitate, 30 minutes of my time to play American Girl dolls with her. 

Time is real and bargain-able!

*

It has struck me that this awareness is growing for her while the rest of us seem lost in the fog of trying to remember what day it is, how many months have passed.... The spring, summer and, sadly, even the fall of 2020 have been usurped by a virus that has more control over us than we'd like to admit.  Its been 6 months since all this began, six months and our calendars have lost their relevance, six months since our internal clocks broke. 

“The running joke is, you know, we used to have Monday, Tuesday, Wednesday, Thursday, and now we just have Day, Day, Day, Day, Day,” said Dean Buonomano, a professor of behavioral neuroscience at the University of California at Los Angeles, in May. “We’ve sort of lost our mental landmarks or temporal boundaries for days.”

*

Personally, I too am lost. I'm an artist who's also a realist (crazy) who needs order (still crazier) in their life. I've filled the last 6 months with do-able projects - anything that has a beginning, a middle and (Yes!) an end! 
Gardening; digging up and planting new beds, moving, dividing, creating. 
Cleaning out, organizing and shedding possessions.
Home projects; painting, and even building a new front walkway.
And sadly..... lots of crossword puzzles. Hell, I'm all the way back to 2007 in the NY Times archives!
I need to snap out of this so I can return to the world of the casual, no rush reading of a delicious new novel and the wide open discovery of creating new art. 
No ends are ever needed there - they just miraculously occur. 

I need to connect with that breath that expands forever, that, once again, inspires awe in me. Time is a construct so maybe I just need to give in. As my friend Janet always tells me; "give yourself permission."

*

Yesterday, while Rosie was pushing me on the swing she commented on how well I was pumping my legs.
"Nene, I'm teaching you how to play!"
I need to live up to that for her.

*


Thursday, September 10, 2020

in the POD - busy bees


living their best life....


*

 SO you might be asking.... what the hell have you been doing for the past three weeks?!

Well we haven't been resting on our laurels and there is not any significant visual change to the van. We have filled the time with lots of little things, lots of decision making, a few changes and some waiting on various parts to move forward with. 

All good.


First, we finally got the running boards put on! It surely has made it much easier getting in and out of the van. There is one at the driver's side door and then this one on the passenger side - spanning both that door and the big slider.


Side running boards


*

The 6 solar panels are now fully mounted and installed on the roof. We are using Renogy 175 watt panels which are directly connected to a Renogy Rover 60 amp charge controller. The controller is then connected to the battery.


6 solar panels on the roof of the van

*


The panels are mounted on aluminum frames made from 8020 aluminum profiles. The panels along with the structure are secured with stainless steel screws.


you can see the main frame as well as the framed sections of panels


*

Over the past few weeks a lot of time has been spent on the "garage" - discussions, drawings, placement of equipment, mounting systems, un-mounting systems, moving those systems to a new spot, remounting ..... you get the picture. Basically trying to find the most efficient placement for everything that needs to be there. 
Ultimately, the structure within the garage will be built out of the same 8020 aluminum profiles that we used on the roof. I suggested that we first do a mock up out of wood so we could get an actual sense of what fit where/best. This worked out great -  we learned a lot and changed the position of a number of systems all for the better! 

Now that the plan for the garage is set Tim was able to order the balance of the 8020 aluminum and has begun creating the rest of the wiring and plumbing lines that run into and out of here. 

mock up of the garage


*

progress report on other systems:

Toilet and black water tank have been set up and the system has been tested. It works!
No pics yet..... because it has all been dismantled while we rebuild the whole bathroom frame from 8020 aluminum profiles.

Rear view camera has been installed. The Sprinter comes with a fantastic back up system: camera, and sensors that depict the whole backup experience on the dashboard video screen, and includes beeping if you get too close to anything. Very cool and very useful. That said, because the back doors have no windows, the van did not come with an inside rear view mirror. So we purchased a dash cam/rear cam that uses a rear view mirror style screen. Now we can watch our rear! with the dash cam full time, while recording both the dash cam and rear cam while driving. 


Friday, August 14, 2020

in the POD - slow and steady


sometimes one has to work in unfamiliar territory....

*

This week has been full of many projects both big and small and ....mostly hidden.

The air conditioner finally arrived and Tim has been working on getting that hooked up. Most camper vans  tend to have roof AC units. However, we wanted to have 6 solar panels on the roof, leaving no space for a typically large AC unit,  thus we created a space in the "garage" for the AC unit and a spot under the carriage where the condensor will hang. We selected the HD 12L with dual fan condenser from cruisencomfortusa.com

Getting the AC unit up and running has been an important goal. Cannot stress enough how hot it has been lately and working inside a tin can has not been easy!


flooring in process

*

The radiant heat panels and tubing for the floor is done and all the flooring is in! The heating system will be zoned - floor (including cab), walls, and garage. We are using Roth radiant panels from roth-usa.com with 3/8" Pex piping.

The flooring is Smartcore PRO waterproof flooring from Lowe's. We selected the 12"x23" tile-like in Twilight. Unfortunately, I do not have a pic of the finished floor because we immediately covered it with Rosin paper in order to protect it during the build process. Prior to laying the floor I created a map of the heat tubing - yeah, not our first time at this rodeo. This way, once things start getting secured to the floor we have a very clear picture of where NOT to screw in! 


a protected floor

*


 And yes, the final two windows are in and took less than 2 1/2 hours to install them both! The day before the install I created the template and Tim marked them out on the sides of the van. (These are the windows in the bedroom area) The walls are now ready to install the last of the radiant heat panels. 


driver's side


*
In this pic you can see the solar panels laying on the roof. They are not attached yet - they will be mounted on aluminum frames constructed from 8020 aluminum profiles from 8020.net  - but they are currently providing more than enough energy to run a large box fan that we are now using in the van while we work. 

passenger side


And I will leave you with this .... because everyone needs an adventure!


*


Sunday, August 2, 2020

in the POD - the adventure continues


the "garage"


*


Our break from installing windows didn't mean an actual break from our list of all the 
things that need to be done on our van. And, I'm not actually sure how this happens but that 
list seems to be growing.....


sound dampening and 2 layers of insulation installed after the windows were put in

*

I finished the layers of insulation around the 3 windows. I know, it looks so simple ... and yet it took me close to a full day to complete because of all the odd angles and some really small spaces. 


While I did that Tim began work on the "garage". The garage is, for us, the last 2 feet of the van and will hold all the infrastructure systems for the van. This is all the stuff that Tim had been testing and assembling on the porch earlier this spring.

The garage will house:

300 amp hour lithium battery and 3,000 watt Magnum inverter
30' retractable 30 amp shore power cable
All the electrical control systems including a Renogy solar charge controller
12 volt and 120 volt control center
12 volt air conditioning system
Portable 1800 watt generator
Diesel fired hydronic heating/hot water system - powering the radiant heat in the floor and walls and the kitchen and bath hot water
Filters and UV sanitation for the recirculating shower
Retractable hoses for both fresh water and sewage

and ..... this list may grow.


radiant heat added to the garage

*

Radiant heat panels and tubing were first added to the floor and walls of the garage followed by the flooring. Radiant heat panels are currently being added to the rest of the floor and walls of the van.


beginnings of the garage install

*

Tim is building a metal frame system to hold and support the mechanics of the garage. The main control panel - seen at top in the photo - will face into the van for easy accessibility. 

In the week ahead the focus will be on getting the radiant heat panels and tubing in, continuing work on the garage and infrastructure systems, and possibly getting the flooring in. The final two windows have been delayed and are not scheduled to arrive until the end of the week.

Each day we find ourselves with a new question, sometimes a different plan, sometimes a change - yet, all of it, a welcomed challenge. We have no one to please but ourselves.

*

Oh ... and we did install an additional fold up passenger seat. It's for Rosie.

two passenger fold up seat behind the driver


*


Rosie checking it out.

*


Sunday, July 26, 2020

in the POD - one step at a time.....

The scariest cut of all - making holes for the windows!!

*

And so it has begun. 

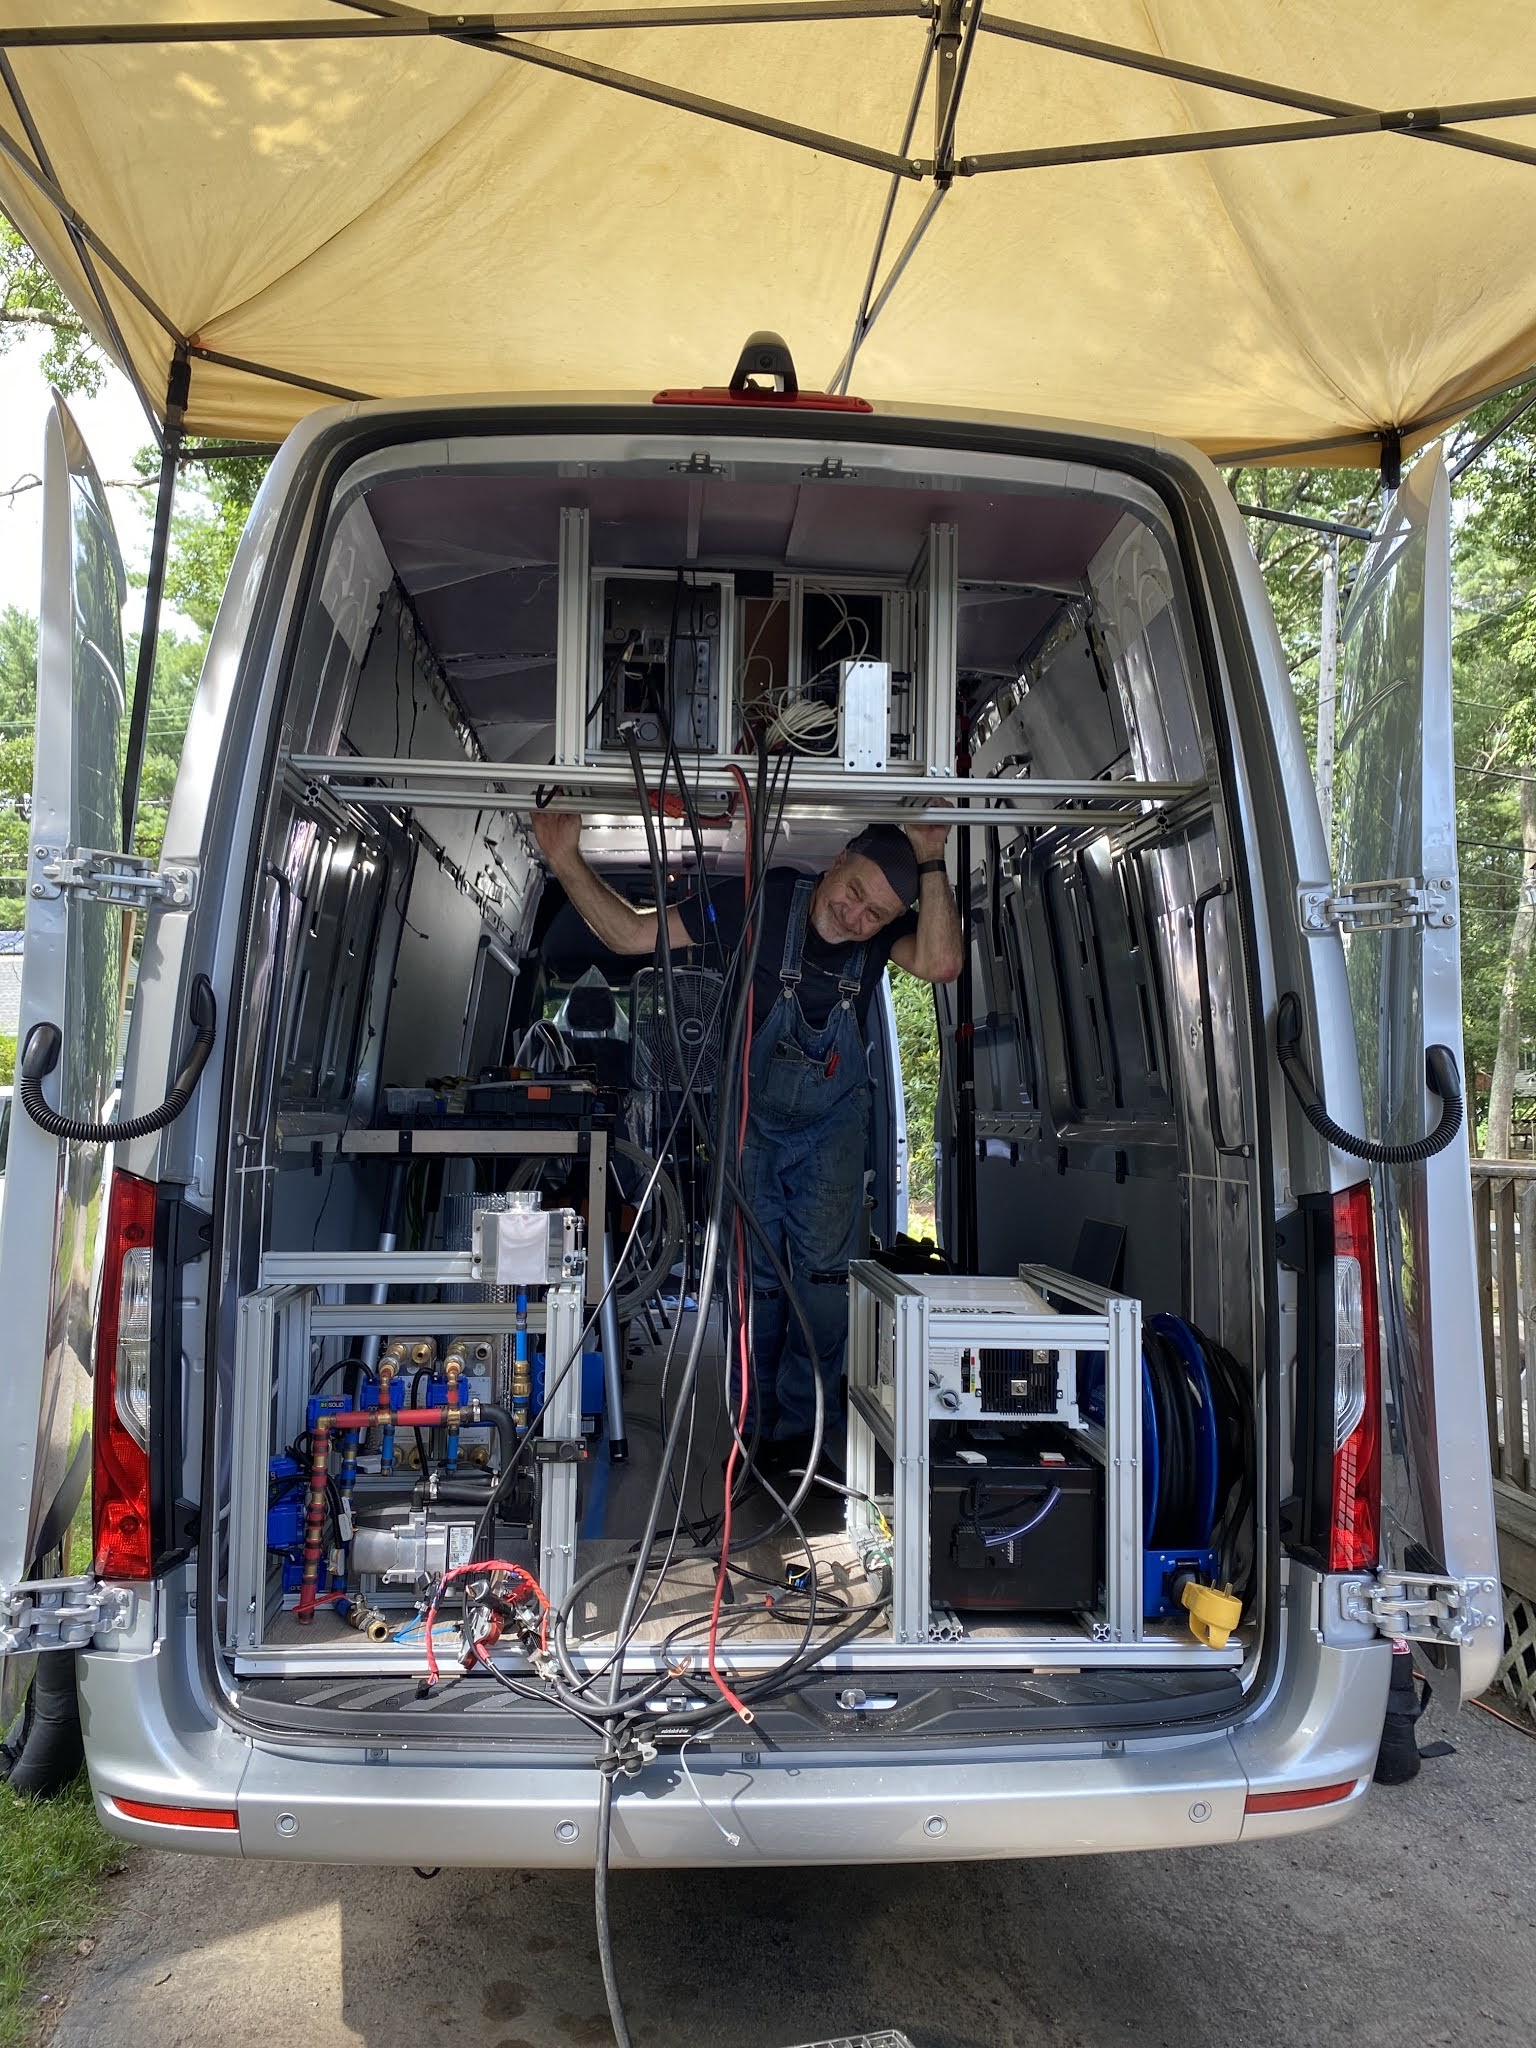
On July 1st, we took possession of our new van, a Mercedes Sprinter on a 170" wheel base with an extended body.  Our total length is 24.5 feet, a dramatic increase from our 19 foot Roadtrek Agile (also a Sprinter chassis)!  

Tim had already put months of work into this project - researching electrical, solar, plumbing systems,  designing the layout, and creating a spreadsheet with all the needed parts (with links and costs). Once we decided to move forward with up-fitting a new van ourselves he began ordering parts, pre-assembling the internal systems and testing them..... over and over. The back porch has become the "workshop" and storage facility for windows, water/waste tanks, radiant floor panels, hoses, generator ....... and the roof has been the testing ground for 6 solar panels which are currently running a small fan as well as the new refrigerator for the van. 

Over the past 25 extremely HOT days we have been working non-stop. So far most of all the work has truly been the grunt, totally non-sexy part of the up-fitting. Yup, all the stuff that, ultimately, will never be seen - but are essential to how we want to travel.


This is where our story begins.......

*

Step 1
Remove the wall panels that the van came with.
Apply the sound dampening material. 

Vans are a whole lot of metal speeding down a highway. When they go over bumps the metal rattles. And rattles are super annoying.

These Noico Solutions panels come in fairly large @ 18" x 29" sheets that can be easily cut with a scissors. They have a self adhesive back and we used a small metal brayer to firmly attach the panels to ALL the interior walls, ceiling and wheel casings. (Note: At this point we did not do the 5 sections where we will be adding windows. We will complete those spots after the windows are in)
This was a tedious job but once we found our groove it went fairly quickly. We also began adding the next 2 layers of insulation (steps 2 and 3) as we completed each side of the van.


Tim using a brayer to secure the Noico panel

*

My job was, mostly, measuring and cutting ......

*

Step 2 and 3
Apply Reflectix - a double reflective insulation and Foamular Insulation Sheeting.

On top of the sound deadening panels we added two layers of insulation. This will help keep our traveling Pod cool in hot climates and warm in cold climates! Strangely enough we have found ourselves traveling  to many cold areas and have often awoken to below zero temps and a few frozen pipes. Yeah .... not great.

 Which brings me to an important piece of info about Tim's plan for our new Pod. Most upfitted van units place the holding tanks under the chassis and run all the water lines in the outside walls of the van. (I bet you can already see the problem.) This is NOT how Pod 3.0 is going to do it! Everything will be inside our layered and cozy interior! More on that when we actually get to installing all the cool things that Tim has been diligently testing on the porch .........


Back to the grunt work.
Both the Reflectix and the Foamular sheeting had to be cut to size to fit in all the nooks of the van walls.  Each layer was glued into place using Loc-Tite construction adhesive. We then filled any remaining spaces and cracks with Great Stuff spray foam. Once the foam was completely set/dry (@ 24 hrs) it was trimmed to be flush with the final insulation layer.

Reflectix and the Foamular sheeting process

*


Ceiling completed!

*


Nothing to see here!

*

Once all the insulation was completed we put the original wall panels back in place. The walls are now ready for their next layer ..... but first the windows need to be installed.

This was by far the scariest (for me) part of this whole deal - cutting holes in a brand new van!! I mean its not like you can "stitch witchery" it back together. I truly wanted no part of this process but Tim insisted that "we're in this together, if we fail we fail together." (Yeah... something like that.) 
And we did it together! 
And we are still speaking! 
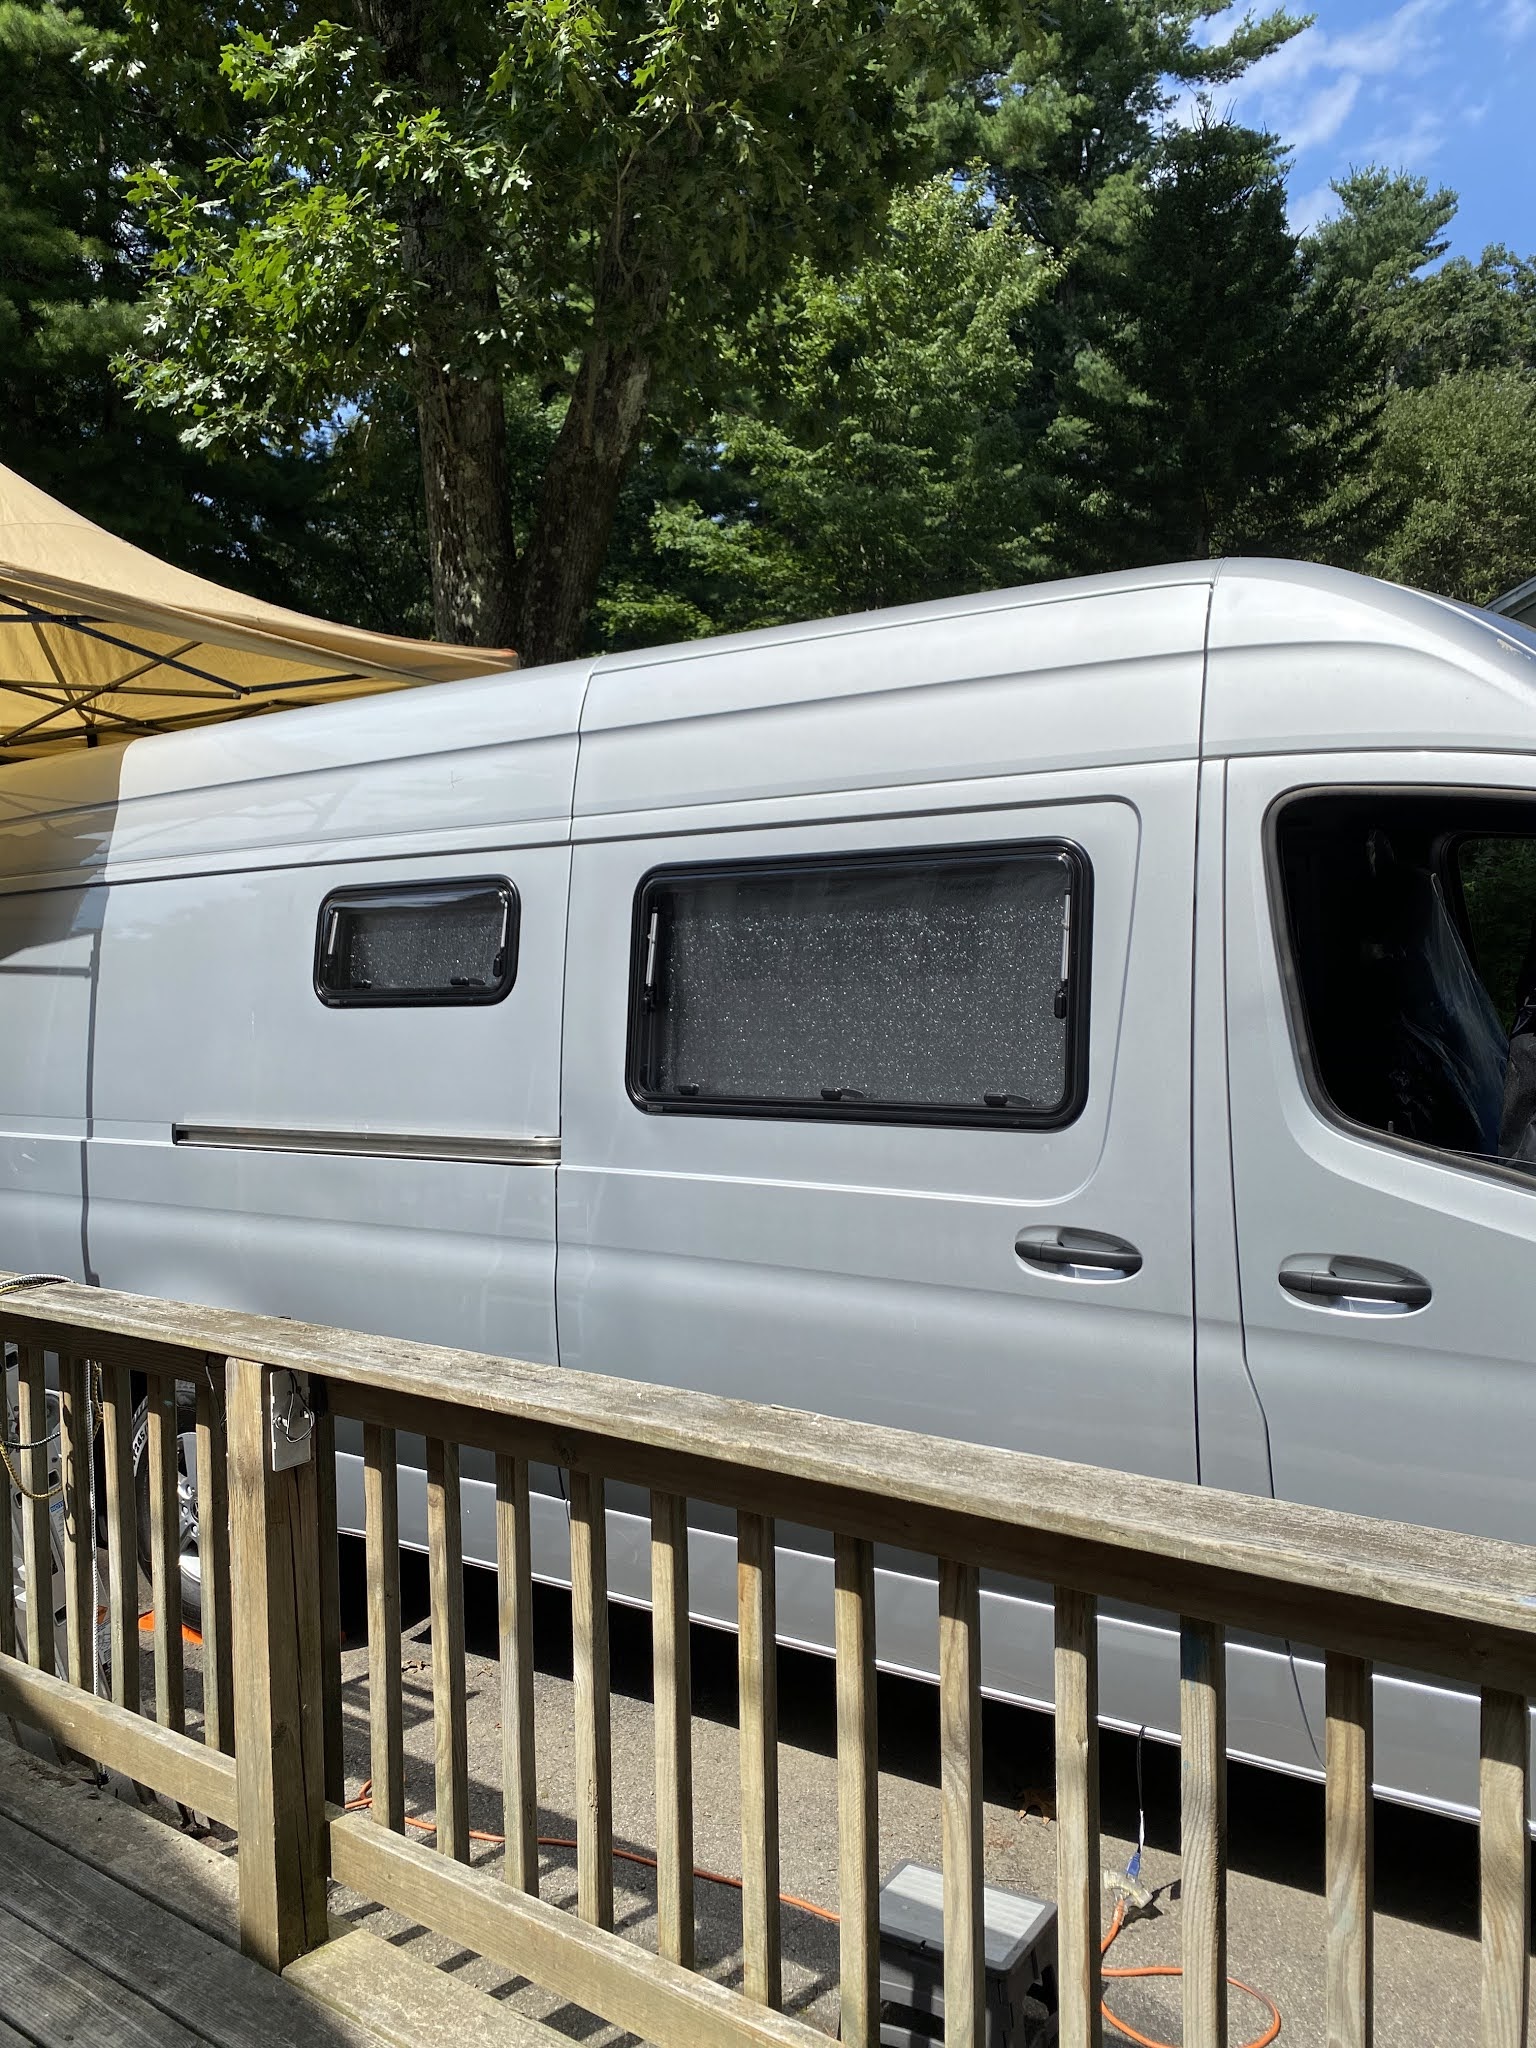
And we currently have 3 windows installed!! 

the first cut is the deepest....

Creating the first template  (we will have 3 different sizes) was a bit nerve wracking - like creating a costume pattern that has to be perfect on the body the first time it is put on. Ugh. We started with the smallest of the windows - which will sit above the galley counter. Our first window took us approximately 5 hours to put in.


First window completed. 


Once the hole is cut a frame is constructed on the interior of the van - this is to both support the window as well as make it flush with the finished wall. The frame is constructed of laminated PVC boards and attached to the wall with 3M VHB (Very High Bonding) double sides tape.


Attaching the frame.

*

Our windows are Arctic Tern manufactured by Tern Overland and supplied to us by campervan-hq.com.  They are made in Europe and feature double pane acrylic glazing and include a separate interior cover panel containing a retractable screen on top and a black out shade with a reflective exterior on the bottom.


Arctic Tern windows with retractable screens and 
blackout blinds.

*


Open window on driver's side

*

Sliding door and Galley windows

*

We are taking a break before adding the last 2 windows - because they won't be here until next week.